
How it works
We have updated ParkMate
To learn more about our new look homepage, features and how to navigate through the app, select the below links to jump to the area you want to learn about.
To view the guide for our old app click here.
New Interface
New Interface
Home Screen
This is the screen you will see when you open ParkMate. From here you can search for car parks, navigate the app, start/stop or extend your parking sessions, and more.
- ‘Account‘ menu.
- ParkMate Notifications.
- Report an issue.
- Search for an address or car park.
- ‘Map‘ view car parks in a map view.
- Add or view favourite car parks and sessions.
- Park again at your last car park using your most recent session.
- ParkMate Promotions & News.
- If you have an active session, this will be displayed at the bottom of your Home screen.
- View your active session.
- Stop (for casual) or extend (for prepaid) your active session.

Notifications
The Notification screen will keep you up to date with your latest parking session reminders, as well as general notifications about rate changes and car park closures.
- Return to Home screen.
- The settings icon will take you to the in app notifications settings, where you can enable or disable different notifications settings. We encourage you to have all these settings turned on.
- The ‘Parking Reminders‘ tab provides notifications relating to you current and past parking sessions.
- The ‘General‘ tab provides notifications relating to rate changes and car park closures. It follows the same screen layout as the ‘Parking Reminders‘ tab.
- ‘Today‘ displays parking reminders that have come through today.
- ‘Previous‘ displays parking reminders that have come through in the past.

News & Promotions
Keep up to date with the latest News & Promotions happening regarding the ParkMate app.
- Swipe across the carousels to view the most recent News & Promotions. Tap on the carousel tile to learn more about that news or promotion.
- Tap ‘See all‘ to view all current News & Promotions regarding the ParkMate app.
- Return to Home screen.
- Swipe across the carousels to view the most recent News & Promotions. Tap on the carousel tile to learn more about that news or promotion.
- View older News & Promotions in the list. Tap on a section to learn more about that news or promotion.
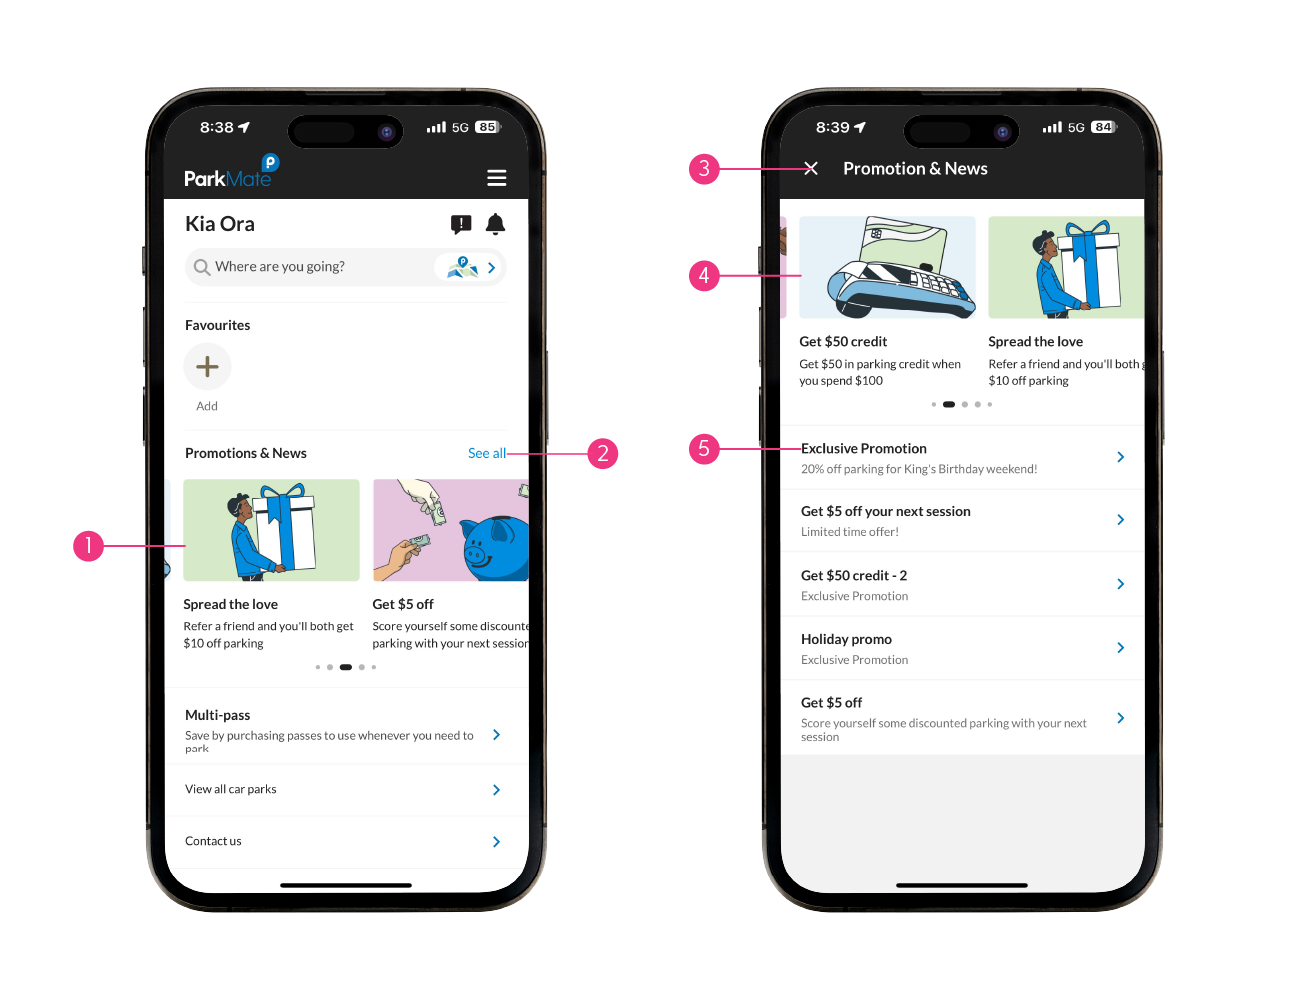
Disclaimer: News & Promotions tiles shown in the images above may not be representative of active or current ParkMate News or Promotions. Images are meant to illustrate ‘New & Promotions’ tiles.
Account Screen
View and edit your account details, settings, payment methods, licence plates, notifications and more.
- Return to Home screen.
- ‘Account Details’ update or change your account details.
- ‘Wallet‘ add, remove or change payment methods.
- ‘Vehicles‘ add and remove licence plates and enable Licence Plate Recognition.
- Update your notification settings. We recommend keeping all notifications turned on.
- View your receipts and transaction history.
- ‘Favourites‘ edit favourited car parks and sessions.
- ‘Multi-pass‘ purchase session bundles (Coming Soon).
- ‘Promo codes‘ view and add promo codes.
- ‘Bundles‘ purchase and manage parking bundles.
- ‘Subscriptions’ monthly parking subscriptions (Coming Soon).

Map Screen
View car parks on a map, search and filter by specific criteria and more.
- ‘Filter‘ refine your car park search by ‘Tags‘.
- Return to the Home screen.
- ‘Sort by‘ refine your search list order.
- Blue car park pins represent car parks you have favourited.
- Black car park pins represent non favourited car parks.
- Toggle between satellite view and map view.
- Turn on your location to view car parks near you.
- Search for an address or car park.
- View all car parks.

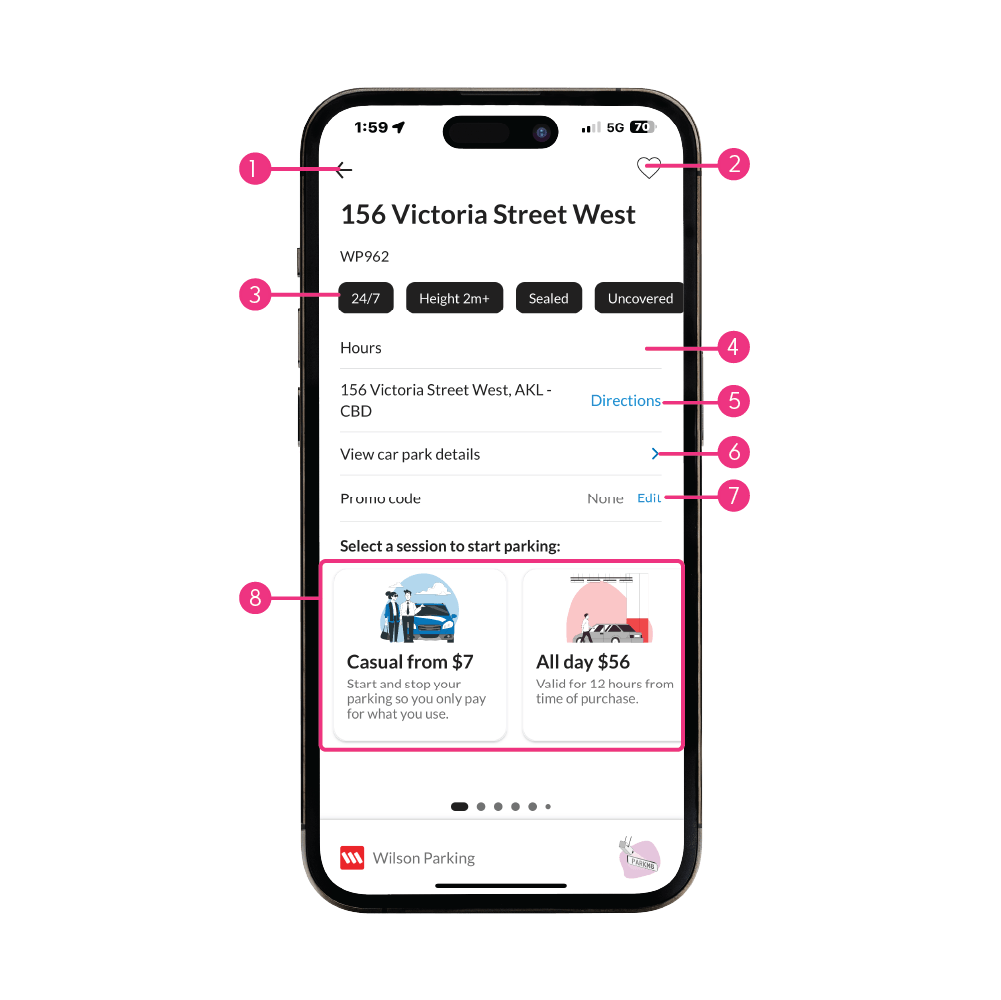
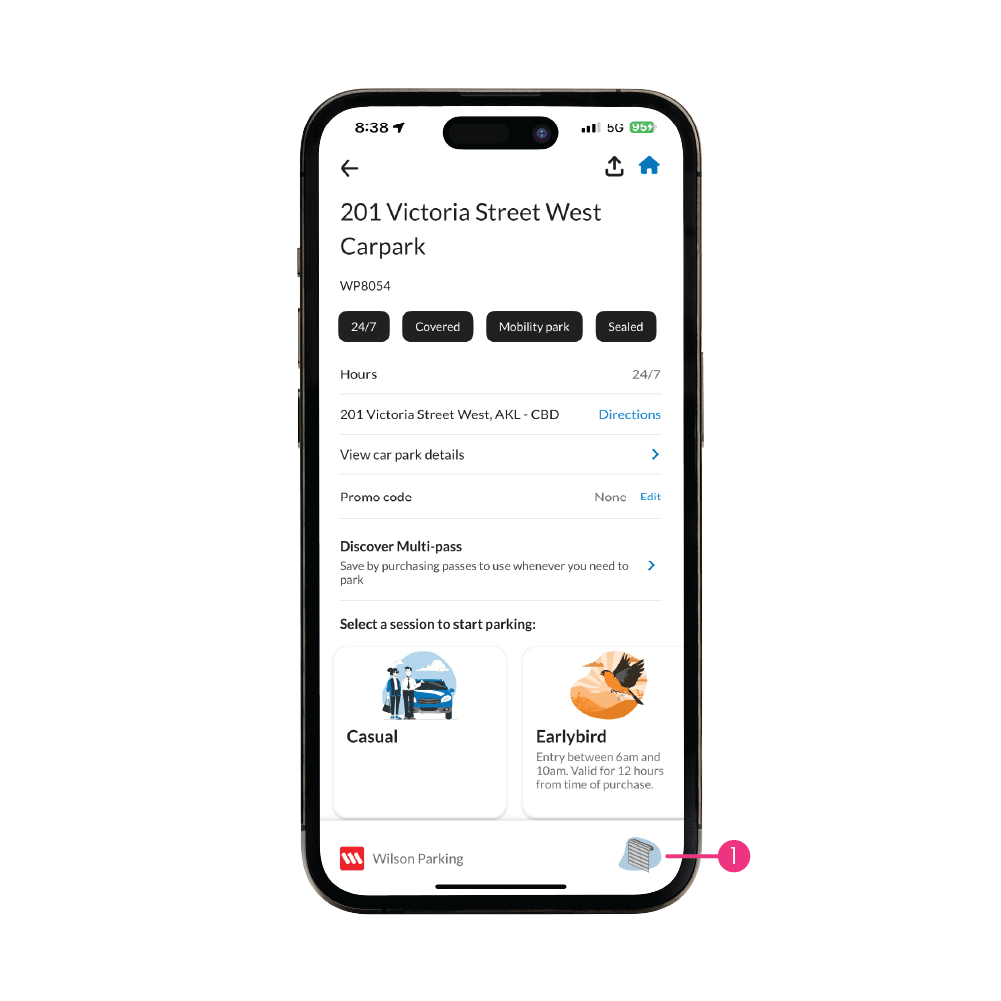
Car Park Screen
View the details of a car park, add it to favourites, add a promo code and select a session type to begin parking.
- Return to the previous screen.
- Favourite this car park.
- These are ‘Tags‘ for this car park. You can use these to filter your car park search.
- ‘Hours‘ the operating hours for this car park.
- ‘Directions‘ opens your maps app to provide navigation to this car park.
- View more details such as photos, full pricing and hours info, bays etc.
- Add or select a promo code.
- Select a session type to start parking. Swipe to see more options. Greyed out options are not available at that time.
Session Screen
Set your notifications, plate, payment method, apply a promo code, confirm and start your parking session.
- Return to the previous screen.
- Favourite this session for this car park.
- Set your parking notification reminders.
- Select a promo code to use for this session.
- Add any notes about this session (optional).
- Pricing for this session + a $0.50 transaction fee. Casual sessions will show pricing when you end the session.
- Add or change the licence plate for your session.
- Add or change your payment method for this session.
- ‘Confirm and start parking‘ to begin your session, then confirm on the following pop up.

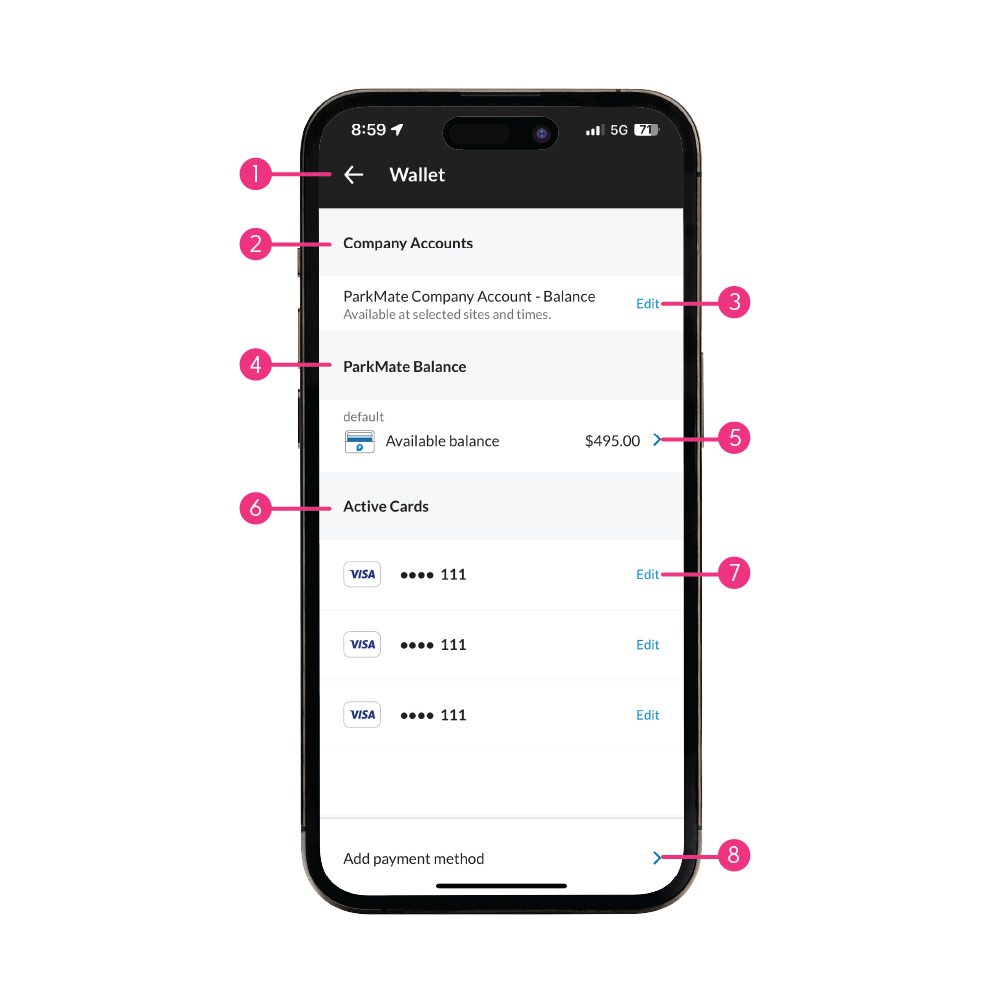
Wallet
Manage the payment methods for your ParkMate account.
- Return to Account.
- ‘Company accounts‘ allows your business to pay for parking.
- Select ‘Edit‘ to set that as your default payment method.
- View your ParkMate Balance.
- Select to top up, manage auto top up, and set as default.
- Active payment cards on your account.
- Select ‘Edit‘ to set as default payment method, nicknames or delete from your account.
- Add a new card to your Wallet.
ParkMate Balance
Add credit to your ParkMate account, reduce transaction fees and turn on auto renew for convenience.
Adding Balance
- Return to ‘Wallet‘.
- Your current balance.
- Make ParkMate Balance your default payment method.
- Enter the amount you wish to top up.
- Select the payment method to purchase your top up.
- ‘Auto renew‘ when turned on, will automatically top up your ParkMate balance when your credit balance drops below a limit of your choosing. This will renew using your most recent top up amount.
When ‘Auto renew‘ is turned off, ParkMate will send a notification instead when the balance drops below your chosen threshold. - Set your threshold amount to renew your wallet balance when ‘Auto renew‘ is turned on, or your balance notification reminder when ‘Auto renew‘ is turned off.
- Confirm your choices, and continue to top up your ParkMate balance.

Multi-pass
A Multi-pass allows you to pre-purchase multiple sessions in advance at a discounted rate. These provide great flexibility for customers who don’t need to park every day.
- Return to ‘Account‘.
- Current Multi-pass deals running.
- Swipe to view different available Multi-pass deals.
- Your current and expired Multi-passes.
- Tap the arrow to manage this Multi-pass.
- ‘Find car park‘ allows you to search for a single car park to purchase a Multi-pass for.
- ‘Find regional‘ allows you to search for Regional Multi-pass bundles that include many different car parks as part of the Multi-pass.

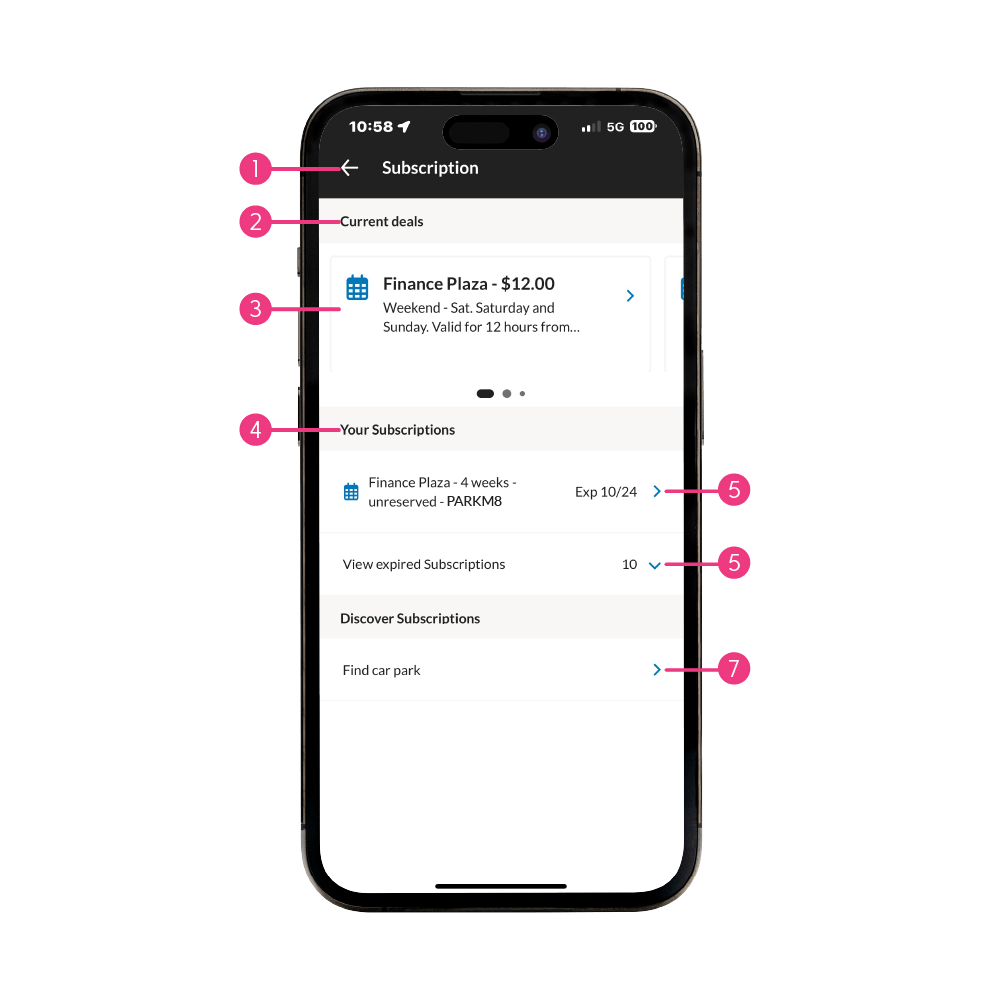
Subscriptions
ParkMate Subscriptions allow you to park around the clock for the duration of your subscription, perfect for those who are regular parkers at a car park. Please note, a subscription does not guarantee a parking spot at the car park.
- Return to ‘Account‘.
- Current Subscription deals running.
- Swipe to view different available Subscription deals.
- Your current and expired Subscriptions.
- Tap the arrow to manage this Subscription.
- Tap the arrow to view expired subscriptions.
- ‘Find car park‘ allows you to search for a car park to purchase a Subscription for.
Roller Door Car Parks
ParkMate is available at select roller door car parks. Through the app, customers can open the car park’s roller and pedestrian door ways seemlessly after starting a session. Click the link below to learn more about how ParkMate works at roller door car parks.
- Roller door car parks can be identified by the roller door icon in the bottom right of the car park products screen.
For roller door car parks specifically, you must start a session first, to get access to the in app pedestrian and roller door access functionality.
Only start a session when in the entry lane, at the roller door to the car park.
Walkthroughs
How To Add a Licence Plate
From the ‘Account‘ menu, select ‘Vehicles‘ to add or edit licence plates on your account. You can also turn on Licence Plate Recognition (LPR)* from this menu.
Licence plates are only able to have LPR enabled on one ParkMate account at a time. The reason for this is if it was enabled on multiple accounts, there is no way for the system to identify which account is using it at that time. If you share a vehicle, you can have the licence plate loaded on multiple accounts, but it can only have LPR enabled on one account at a time.
How To Add a Payment Method
From the ‘Account‘ menu, select ‘Wallet‘ to add or edit payment methods on your account.
How To View Your Account
From the ‘Account‘ menu, select ‘Account Details‘ to update or edit your name, mobile number, email, password and enable location settings.
Notification Reminders & Preferences
From the ‘Account‘ menu, select ‘Notifications and preferences‘ to edit.
We recommend keeping all notifications on to make sure you are always notified about open parking sessions and important updates.
Starting & Stopping a Casual Session
Start and stop a Casual parking session to ensure you only pay for what you use.
We recommend keeping all notifications on to make sure you are always notified about open parking sessions and reminded to stop them when you are finished.
Search For Car Parks Using The Map
Use the ‘Map‘ icon to search for car parks and start a session.
Search For Car Parks Using The Search Bar
Use the Search Bar to search for car parks and start a session.
Adding a Promo Code Before a Session
Easily add a promo code before a parking session to save more with ParkMate.